The battle between Mexican instant food providers

Oh wow.. it has been forever since I last updated this blog. The main reason was because I forgot the password AND the username for the account. Absent-minded me haha, but it’s all good now. I got everything in control.

The incentive of this post (which also pushed me to regain the account) was to compare some fast food brands. I know.. not that exciting. I would have tried to post something that I made but I just moved to Nashville recently and was trying to get used to the place. I certainly did become familiar with their mexican fast food locations, including Chipotle, Qdoba and Baja Express.

Chipotle and Qdoba have always been on the balance table, but I would love to know how they both evolved over time. I guess when I have time I will write something about the business and development of both brands later. Baja Express is an entire new entity for me, and I am glad I tried it. I would say, although I am going into the workforce, my mentality is still of a college student, so I am writing on prices based on my personal wallet. However, for the moment, it’s about the food – taste, quality and worth.

Chipotle: pricy but fulfilling

If anything, Chipotle speaks quality as a fast food brand. I love their chicken selection, very flavorful and adequately seasoned. Their salsas are nice with acceptable heat level (the hot salsa is never hot enough for me). Other ingredients such as pico de gallo, corn and lettuce are fresh and still have that crunch. But I bet everyone also comes here for their guacamole. Yes, there is an extra charge of about $1.20, which in Nashville could bring a $7 burrito to close to $10. However, it is worth the money. The guacamole is very creamy with that beautiful green shade of avocado, and it actually tastes like one. I was happy to find that prolonged exposure to air does turn the thing brown 🙂 Not pretty to the eye, but good assurance.

In terms of price, for my pocket it is a little pricy, only because I haven’t started making money yet. I do believe for the quality, quantity and the freedom of choices that you have, this is a great option for nights when you are too lazy to prepare food. One thing, however, they are not used to greedy people. I know that because one time I was too cheap to refuse any topping options (except guacamole), and the girl looked at me in an interesting way. I didn’t know how to interpret that, but I see just a little bit of disgust in there, like “really? u gotta get everything?”. Yes, ma’am. That burrito bowl lasted me 2 meals which I appreciated greatly, but I guess I won’t do that again..

Qdoba: there’s always room for improvement in food, not cost

I think Qdoba knows deep inside they need to improve in food quality, that’s why they offer even more selections than Chipotle. Some of them are genius, in my opinion. First they offer a wide selection of quesos (or cheesy sauces, I would call them), then they offer to dress your burrito in that quesos instead of wrapping it in your burrito. Yes, I am talking about the smothered burrito, their signature dish that I find extremely intriguing (personally burrito is dry food for me so putting sauces on top of it seems strange). This afternoon, when I came to a burrito branch near my workplace, two people before me ordered it and seemed content. So, the trick worked, and it is obvious that Qdoba has some great thoughts in terms of marketing their products.

That being said, I wish their food could match up with their brilliance in drawing customers. Of course when you want to compare two different places it is not a great idea to order two different dishes…, but I think it gives me a good idea of how things are. Instead of chicken, I ordered the ground beef burrito with the chipotle cream sauce and an extra of guacamole (of course!) at Qdoba. After all, their chicken is chewy and not very flavorful anyway.

What I would like to say is “NOT BAD”, but what I am going to say is “NOT TOO GREAT”. Qdoba offered the same price for chicken and ground meat. So with the free guacamole, overall I spent less money for this burrito. However, the flavor was not worth the amount of money I had paid. The meat was overly salty for my taste, and the guacamole was.. tasteless. Even when I ate the guacamole separately, I could not come to find the creamy avocado flavor. One thing to note, also, is that somehow the Chipotle cream sauce and the sour cream became non existent. It always happens with Qdoba for some reason, and I love sour cream..

Baja Express: different approach, different result

I am not too familiar with Baja, but I was impressed with their execution. Compared to Chipotle and Qdoba, Baja seems to incline more to the traditional mexican side of food. They offer mexican rice, guacamole, fresh avocado and cilantro. It was a pleasant surprise to see actual avocado slices and cilantro in the selection. One of the things they do was interesting: they heated the cheese with the tortilla, doing it very fast that I’m not sure you could stop them if you don’t want cheese. Overall, ok taste, everything was mildly seasoned, not very flavorful. However, I think their tortilla beats the other two’s.

Conclusion

So the verdict may seem obvious, but it really isn’t. Baja aims to present more authentic mexican ingredients, Chipotle provides great tasting and fresh food, but Qdoba is not a bad alternative. If you want to save a few dollars and guacamole, go for Qdoba. If you would like more traditional mexican options, Baja might be your friend. However, for me it will always be Chipotle, because I am willing to eat their burrito (bowls) even without the avocado goodness, because those flavors and the great feeling when you have a bite are worth $8. Plus, I like the setting 🙂

P.s.: Until Qdoba can increase their taste, I will be a loyal to Chipotle.

Kimchi Fried Rice 김치 볶음밥

One of my favorite korean dish, fast and simple as well!

Ingredients

  • Rice
  • Kimchi (with juice)
  • Vegetables
  • Tofu/Ham/Tuna
  • Egg
  • Dried seaweed
  • Seasoning (salt, soysauce, sugar) and vegetable oil

IMG_2175

I recommend using one-day-old rice because it is lower in moisture and more suitable for frying. Here I had sesame oil and some zucchini so I just used those instead of the normal oil and proteins. I also used brown rice because it’s healthier.

First, have the kimchi cut into small bite-size pieces and vegetables sliced thinly, then sautee them with the oil on medium heat until the vegetable is almost cooked. Add in the rice, and the kimchi juice, mix well to coat the rice (it will look reddish at this point).Stir fry the rice till heated thoroughly then add in the cooked proteins if using, cook for another 1-2 minutes, season to taste. To finish the dish, plate the rice with a sunny side up egg on top and sprinkle with dried seaweeds.

What I have learned from making this is to always have more kimchi juice than you think you need. At one point I needed more kimchi juice but didn’t have some on hand so I added gochu paste 고추장 instead. As a result, my rice came out redder than it should be and had more of a bibimbap taste. It was good nevertheless 🙂


Box brownie quick fix

Box mixes are probably the easiest thing to work with when it comes to following instructions – dump, mix and bake. However, they are quite tricky to alter because the exact dry mix proportion is not available. I usually make my sweets less sweet then most recipes call for, so when I have a box mix the product would come out much sweeter than how I want it to be. With the unknown dry mix ingredients, reducing the sweetness of the mix could be a problem. And of course I had to experiment, that’s what this blog is all about!

My mix was Ghiradelli’s Dark Chocolate Brownie Mix (no I cannot bake brownies or cookies). It was supposed to be dark but it was so sweet so I was not too content. Thus the second time I made this brownie (this time) I spiced things up a little bit.

The original box instructions called for 1 egg, 1/4 cup oil and 1/4 cup water. I added an extra 1/2 cup of flour with a pinch (roughly 1/4 tsp) of baking soda and a pinch of salt to the dry mix. Since I added more flour, I thought I should increase the fat and liquid that goes into the mix so I went a head and added 1/8 cup buttermilk (which gradually increased to 1/4 cup..) as well. However, the mix came out a little denser than I thought, so I added about 1/8 cup of water (I didn’t measure this but I would start with a table spoon until it reaches the right consistency).

The brownie batter was poured into a square pan 8″ (?) and baked for 35 min. It came out alright, although I still think it was a little too sweet, but my housemate confirmed that it tasted less sweet. It worked out I guess!

If I was to repeat this, I would definitely introduce some more cocoa powder to the mix and bake it less, probably like 3 tbsp cocoa powder + enough flour to make 1/2 cup and bake for 30-32 min and let it cool for a more fudgy brownie. I am not sure if keeping the egg at 1 would be a good idea, but for sure I would mix in one ripe banana. That would make up for the missing egg, if there is any. If there is not, I don’t think banana chocolate brownie could be that bad.

So yeah, that’s all for now. I’ve got a lot of experimenting that I want to do, so I’ll post them up when I found the right fixes 🙂

-Thanh


Braised fish with vegetables

I am going to be away for a few days so I was looking for a way to get rid of some vegies and I happened to have defrosted a tilapia fillet. Hence, I just wanted to do something with both. I have been experimenting with food recently, using different spices. One of my favorites to work with fish is cumin. So for this dish I threw in some along with some random spices I found in my kitchen.

IMG_2151

I minced some garlic and shallots, quickly sautee them in oil, then I added in two cubed tomatoes (seeds removed) and season with salt and ground cumin.When the tomatoes disintegrate a little, add some water, Chop up some basil leaves and add to the pan as well. When it all comes together, I added the fish fillet and chopped brussels sprouts, However, it would have been better to finish off the greens before the fish. Let the liquid reduce till a third (just a tiny bit of sauce left).

I had to break the fish apart because the brussels sprouts did not have enough space to cook. Always remember to season. At the end I added the juice of half a lemon. and Voila! I had it with a tortilla but it would taste awesome with rice as well 🙂

-Thanh

Too much pizza? Freeze them!

Just a quick post. If you’re like me who craves cheese and pizza most of the time, this might be helpful although I’m sure people do this all the time. Anyway, I tend to crave pizza whenever there’s a deal and of course I would fall for it. What happens usually is that I would order a large and cannot finish, but the glutton in me would try as hard as she can. As a result, I would feel so sick after eating so much and gain a few pounds afterwards, yet also spend a lot of money in just one meal when I could eat that pizza for a few meals. Having a large pizza in front of you is hard to resist, but if you know how to portion it and store it, that pizza will last for a while.

Last time, I had a medium domino’s that I was almost done with. However, I could not get myself to devour the last 4 pieces (Thank goodness!), since I ordered it with the cheese bread as well. I didn’t want to just leave it outside so I decided to freeze it with a date on top. I put 2 slices of pizza in a freezer bag which I think is appropriate for a dinner and separated them with a piece of wax paper so they wouldn’t stick to each other.

The craving was just spontaneous, so right after that meal the pizza totally slipped my mind (because it wasn’t in front of me all the time!) until one day I happened to open the freezer and see two pizza bags. I was lazy that day and did not want to cook so it worked out, otherwise I would have ordered another pizza.. Anyway, I preheated my oven to 350F and slipped those 2 slices in for 15 minutes (or until it’s nice and warm and you can smell it again). Of course it wasn’t as good as a freshly baked pizza, but it’s very close. I enjoyed it actually because of the crunchy crust created by double baking 🙂

I have never thought about freezing cooked food, because in Vietnam my mom never does so. It just feels strange, but I do appreciate this discovery I made since now I can portion myself even before I start eating! Because the pizza is already cooked, I would say I could leave it frozen for a few months, maybe 3? I wouldn’t go that long but one month is definitely OK. This way, I can make use of those LARGE pizza deals and not set my pocket on fire. AHAHAAHA

-Thanh

Soda bread/Giant scone

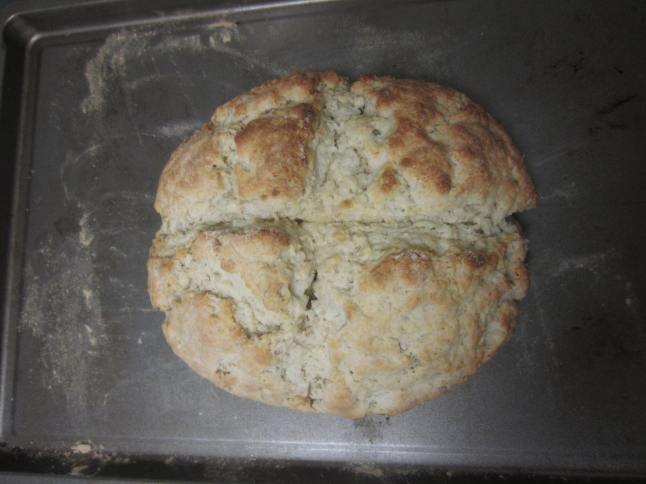
Here we go again with my scone obsession. I have gone over some recipes and I found something called Irish Soda Bread. To be honest anything to do with Bread scares me because I would associate it with yeast and I have had no luck with this organism so far. Anyway after a while reading + synthesizing, I realized that Soda Bread is no different from a scone, except that it’s much bigger with simply baking soda as a leavening agent. Thus, I decided to adapt the scone recipe I posted earlier into this. It is really the same except that I substitute 1/2 cup chocolate chip for 1/2 cup oatmeal.

All you need to do is follow that recipe until after you mix in the buttermilk. Instead of dividing the dough into small pieces, I shaped it gently into a round disk roughly 7.5 to 8 inches in diameter and cut an X on top with a sharp knife. Since this is a bigger dough, I lowered the oven to 375F and bake it for 30-35 min but would check at around 25 min. After it’s done I let it cool and store it in foil on my counter for a few days 🙂

Look how much it grew!!

Look how much it grew!!

That’s it! Another easy quick bread. I didn’t name it Irish Soda Bread because I wasn’t sure if what I did was Irish since I just changed 1 step from the scone recipe… It turned out good nevertheless. Give it a try!

Pesto inspired quick meals

So my housemate got this fresh bunch of basil from the Farmer’s market because we wanted to make pesto pizza. Of course, as usual, the plan was cancelled because we didn’t have pine nuts or Parmesan. I guess we were just craving pizza and pesto. Anyway, my supervisor suggested trying it without the pine nuts so I went ahead and made it happen. I used all my cheap ingredients: olive oil, garlic, basil, salt and my 2% cheese stick which I was trying to get rid of. The pesto came out nice creamy green color but the taste was lacking. That was expected though.

Tilapia with some Brussels Sprouts

Tilapia with some Brussels Sprouts

Inspired by this home-made “pesto”, I immediately followed through with a tilapia fish taco topped with avocado and sauteed Brussels sprouts. After trying it I have learned that you need some acid with fish, so maybe more lemon next time.

Low quality image!

Low quality image!

The day after I made a cheese pesto tortilla “pizza” in which I literally just threw all my cheese on top of the tortilla with my “pesto” and baked for 10 min at 350F or until the cheese melted. Mine came out a little hard because I wanted the cheese stick to melt as well.. but if you are using shredded cheese I think 8-10 minutes should be good.


So that’s my experiments with pesto and pesto inspired food haha. Hopefully they turn out better next time!

Image

Chocolate Chip Buttermilk Scones

This is absolutely one of my favorite recipes – quick and fun to make. The richness of butter combined with the soft and airy texture created by the buttermilk, these scones are the bomb and have pleased everyone who had them. They take literally less then an hour to make, and if you are organized, probably roughly 30 minutes. A type of quick bread and extremely versatile, buttermilk scones have quickly jumped up my sweet list ever since I made the first batch.

As an analytical chemist I am extremely meticulous and careful with my decisions, and thus before I even attempt to try a new type of dessert/food, I do a lot of research on it. For these scones I have watch over 10 videos again and again to get the technique down and also some variations of how people work with them. They were intimidating at first because a lot of youtube instructors use a pastry cutter which I didn’t have and I just could not grasp the idea of cutting the butter into the flour. However, I did try to do it with knives and they came out beautifully, that was when I became completely hands on with this dough.

Annabelle's method gives more rustic-looking scones

Annabelle’s method gives more rustic-looking scones

This recipe I have here was adapted from Stephanie Jaworski on Joy of Baking. She has a lot of scones recipes but I have always stuck with this one. I have also combined some techniques that I learned from this lady Annabelle White on youtube and Chef John from Food wishes that I will share with you guys.

This recipe makes 8-9 scones, depending on how you divide the dough.

Time: 30 – 45 minutes. Easy!

Ingredients (baked at 400F)

  • 2 cups all-purpose flour, more for dusting
  • 1/3 cup granulated sugar
  • 1/2 cup unsalted butter (1 stick)
  • 1/2 tsp baking soda
  • 1/2 tsp baking powder
  • 1/8 tsp salt (just a pinch)
  • ~ 2/3 cup buttermilk
  • 1/2 cup chocolate chips (optional)

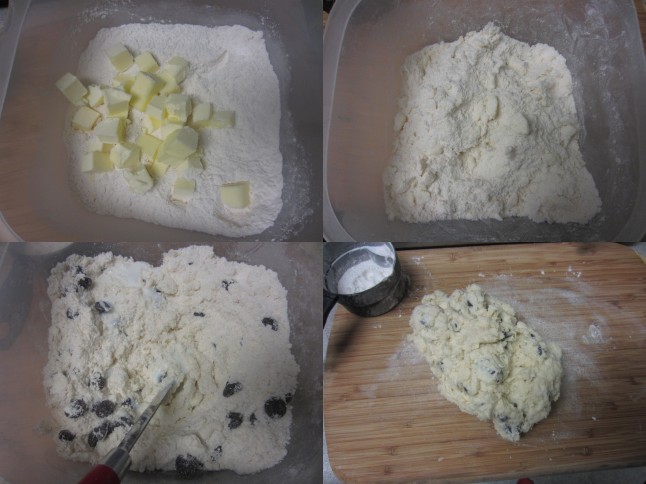
First, cut your butter into cubes and put them into the freezer, save your butter wrapper for greasing the baking tray later. In the mean time, prepare your dry ingredient mix by adding flour, sugar, baking soda and powder and salt into a mixing bowl and mix well, make sure that there are no lumps of anything in there. Everything should be evenly distributed for the scones to rise nicely, plus you will not be able to forget that baking soda taste if you happen to have a lump of them in a bite.

Usually I reduce the amount of sugar called for in the original recipe since my taste buds aren’t prone to really sweet things. However, for this particular recipe, I actually increased the amount of sugar (from 1/4 to 1/3 cup). I don’t think I ever used 1/4 cup sugar though.. but the scones came out very pleasantly sweet. I like them this way more.

After you have mixed all the dry ingredients well and the butter have had adequate time to firm up in the freezer, add them to the dry mix, wash your hands and rub them in to the flour, use your fingers to break them into small pieces, try to mix them in with the flour as you go. Of course as I mentioned, you can use a pastry cutter to cut down the labor but rubbing cold butter feels quite nice~ When the butter has been “cut” into the flour (no perfection necessary!) and the mix resembles bread crumbs, add in your favorite chocolate chips and coat them well with the flour. I have tried these with white chocolate, semi sweet and dark chocolate chips. I have always enjoyed a darker taste since it balances out with the sweetness.

Step-by-step scone

Step-by-step scone

Once the chocolate chips have been mixed in, add in the buttermilk. I have learned to make a well in the middle and add the wet part in there then mix gradually since my French T.A. insisted that we mix crepes this way. It actually works quite well so I continued the legacy. As Annabelle did on her youtube video, I usually use a knife to mix the buttermilk in first then follow up with my (clean) hands. You want the dough to form into a ball and slightly wet, then lay it onto a floured surface. Annabelle said gently roll the dough in flour then just cut them into pieces and bake right away, but chef John has this technique where you would flatten the dough into a rectangle and do some letter folding with it, sprinkle more flour if necessary. I usually do it 3 times then I cut them into 8 or 9 pieces about 1 – 1.5 inch thick and chill them in the fridge.

IMG_2140During that time I would heat up the oven to 400F. When the preheating is done I would remove the pieces onto a greased baking tray and bake them for 12 minutes or until a toothpick (spahetti) inserted in the middle comes out dry. I like to do 6 minutes and then rotate the tray for another 6, maybe it helps with the rising? not very sure. Also according to Annabelle, they come out moister if placed close together :-s

Yum~ chubby and golden

Yum~ chubby and golden

When they come out, do NOT be tempted to try one. I have, and I have learned it the hard way that cooled scones have a much better texture. Somehow when they are still hot, the scone would stick to your teeth which I really dislike. However, I prefer them warm. These scones can be stored in an airtight container for 3-4 days or refrigerated for 5 days. It is really hard for me to have self control when it comes to these so they never lasted for more than 3 days..

Anyway, there you go! Of course you can add anything you want to the batter, just avoid liquid since that might affect the texture. That is why I stay away from the fresh fruits but craisins would go great. Also, if you do not have buttermilk, some milk with cream would be an OK substitute, but buttermilk really does make a different. As a chemist I will go an extra mile to tell you that there is a reaction between the acid in buttermilk and baking soda that creates CO2 and that helps with rising 😉 Bon appetit~

“Fake” buttermilk quick substitute: 1 cup buttermilk = 1 tbsp lemon juice in 1 cup milk

Pan Dulce “Elotes”

Last night, my baking buddy from California decided we should have a baking day. Last time I was in California we took on a project that we weren’t sure could be accomplished. With a bit of skepticism and excitement we attempted to recreate the pan dulce from our childhood. We didn’t quite get it right but we got super close. So this time around we were determined to try again.

Here’s what we decided to do: Last time we tried Conchas or shells in English. They are the classic Mexican sweet bread that you will see in any Mexican bakery. I dare say they are the quintessential Mexican breakfast or even our version of the “tea with company” except its more “hot chocolate with relatives.”

photo-1Anyways, we decided to try something a little different and decided on Elotes, which simply translates into corn. These are also very common but not nearly as popular as the Conchas. When I was a kid I remember choosing these only if my favorite sweet bread was already taken. If I had to describe them, I’d say they are more of an acquired taste. They turned out great! It’s a simple recipe to follow and a lot more straightforward than making Conchas.

Here’s what we did-

 Ingredients: Dough


2 cups of flour

1 teaspoon of active dry yeast

1/2 teaspoon of salt

1/3 cup sugar

1 large egg

1/4 lukewarm water

1 teaspoon of cinnamon

1/2 teaspoon of ground anise

1/2 cup shortening

Filling

2/3 cup flour

1/2 cup powdered sugar

1/2 cup butter (softened)

1 egg yolk

1/2 teaspoon cinnamon

2 drops of yellow food coloring

Zest of 1 orange

It sounds more complicated than it is, I promise! First preheat the oven to 350 degrees. For the dough, mix all the dry ingredients on a flat surface or cutting board. Add in the egg and mix with your fingers. Then add in the water gradually. Finally add in the shortening and knead with your hands until smooth. If it’s still sticky add in a little flour until its not sticking to your hands. Do this for about 5-7 minutes and then cover and set aside while you make your filling.

Now for your filling, mix in all the ingredients until it turns to dough with your hands. We didn’t know what the heck “one zest of 1 orange” so we used a cheese grater to grate the orange until we got about 1 tablespoon worth of “zest”. Or as we call it, orange shavings. We really didn’t know the point of it all…but that’s beside the point. If the filling is still too sticky that it stays between your fingers, add in a touch of flour so that it’ll be easier to work with. Then set this aside. photo-yolk

Depending on how big you want your elotes, separate the dough into about 12 parts. Flatten out each ball until it looks like a tortilla. Then scoop your filling on top (we used about 2 and 1/2 tsp) and roll it out like a cigarette. With the outside of the tortilla looking thing just close it up and pinch until its closed. The whole process should make you feel like a drug dealer rolling up a joint. When you get your butter knife and make cross hatches, then it should look like a husk of corn.

photo-1Et voilà! You have your very first Elote. Finish the rest of them and place on a cookie sheet with wax paper. Rub a generous amount of sugar on each one until it gets between the lines. Bake for 20 minutes. Ours browned on the top because we read the instructions wrong. We flipped them over after 10 minutes, but you’re really supposed to just flip the pan…either way works fine!

Marlene


Tomato Eggdrop Soup – “Cloud” soup

This is my go-to dish when I have some tomatoes and eggs on hand and can’t be bothered to cook something fancy. Since it is a soup, it fills you up quickly which is nice especially for late nights. In Vietnam, It is called “cloud” soup because the egg would float on top resembling clouds, but that is if you do it right 😛

IMG_2132

Cloud..

Anyway, I was getting hungry and it is half past 9 right now so a big meal would not be a good idea. Every time I made this soup, the visual doesn’t turn out so right as you can see.. (the clouds..) but the flavor was very satisfactory. The great thing is it is so quick and simple as well. Basically you just sautee some diced tomatoes in a sauce pan until the color comes out, season to taste, then add a bit of water, bring that to a boil and add more water to cover up the tomatoes and let it simmer, taste as you go.

For seasoning I used salt, sugar, fish sauce and maggi since I didn’t have broth on hand, and YES to the sugar. It makes all the difference. I was very surprised when I discovered that here in the US or probably in European oriented cuisines, people do not utilise sugar at all. In SE Asia sugar is our best friend, together with fish sauce 😉

When the taste is as you want, beat up an egg or more (depending on how much soup you made) with some salt, sugar and fish sauce and add in the soup slowly in a thin stream. I used my chopsticks to create the stream and moved my hands around the pot for even distribution. Otherwise you could stir the soup continuously and add the egg slowly. I had my soup simmering while I added the egg so they were light but on high heat the egg will have a defined texture. Also if you stir vigorously and add the egg mixture in steps, it will mix into the soup in small fine pieces instead of chunking together – your choice! Anyway, if you have enough liquid in the pot, the eggs will float and clouds will form~

So that’s it. Done and tasty! So quick and easy isn’t it? Of course you can add meat or make this into a pasta soup, but I like to have it plain like that. It’s sweet and sour with a touch of saltiness. Light but also delicate, just like clouds 🙂

-Thanh